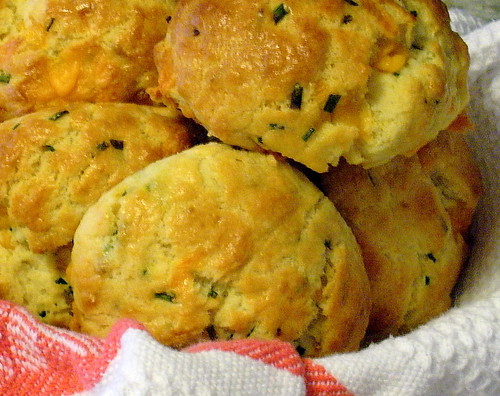
I rarely ever make scones, because I don't keep cream on hand, but after brunching at S's a weekend or two ago (see cinnamon rolls), and eating a version of these, which are a version of Ina Garten's cheddar-dill scones, I decided they were worth a special trip to the grocery store. The recipe is in Ina Garten's (first, I believe) book, The Barefoot Contessa Cookbook. I halved the recipe and copied S, swapping out the dill for fresh chives. These were incredibly cheesy and chive-y.
cheddar-chive scones
2 cups ap flour, plus more for rolling
1 tablespoon baking powder
2 teaspoons salt
1 1/2 sticks cold unsalted butter, diced
2 large eggs, beaten
1/2 cup cold heavy cream
4.5 ounces (yellow) extra sharp cheddar cheese, small-diced
1/2 cup minced chives (I trimmed with scissors)
1 egg beaten with 1 tablespoon milk, for egg wash
Preheat oven to 400.
Whisk together flour, baking powder and salt. Add the diced butter to the flour mixture and using two knives, a pastry blender or your fingers, cut the butter into the flour until the butter is in pea-sized pieces. Those pieces are the key to perfect scone texture. Lightly beat the eggs into the heavy cream and add to the flour/butter mixture. Combine with a few quick strokes. Add the diced cheddar and minced chives, then stir until mostly incorporated. Turn the dough out onto a floured surface and knead briefly and lightly, until the chives and cheese are thoroughly incorporated. Roll out to a 3/4-inch thickness. Cut the dough into eight equal portions, then roll each into a small ball. Place scones on a baking sheet lined with parchment or silicone. Flatten each lightly with the palm of your hand, then brush with the egg wash. Bake for 20-25 minutes until light brown and crusty on the outside.
Yields 8 fantastic scones.
Showing posts with label Bread. Show all posts
Showing posts with label Bread. Show all posts
Sunday, August 10, 2008
cheddar-chive scones


Monday, July 28, 2008
paula dean's cinnamon buns
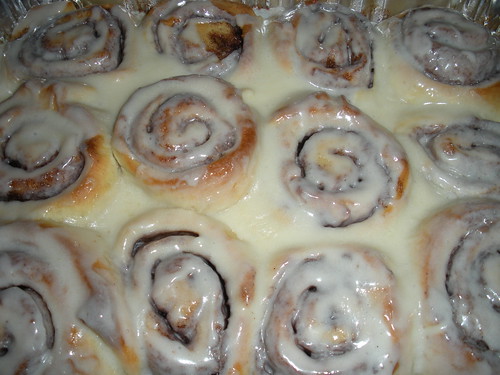
Every time I make these, I am slightly ashamed to admit I used Paula Dean's recipe, but, despite the time it takes to make these deliciously gooey buns (about three hours from bowl to plate), they're the best homemade cinnamon rolls I have ever made. I've made them five times in the last year, including this batch for one of my best girlfriend's recent brunch.
Here is the recipe, although I make a few alterations. Cut the butter for the filling by at least two tablespoons, or the rolls will fall apart. Add a little cinnamon to the filling for more cinnamony goodness, even more if your cinnamon is old. I make the filling with homemade vanilla sugar, but that's just extra credit.
Sunday, June 15, 2008
i wish i had a fridge muffins
I made these muffins because I just purchased some of those nifty nut and party cups to use as muffin tin liners, a la Chockylit of the apparently defunct Cupcake Bakeshop and because the refrigerator-less state of my otherwise lovely office means that I can't carry the sort of snacks and foods to work that I would bring normally. I wanted something whole grain and savory, and these hit the spot. I put in just a smidge of regular old ap flour to prevent the muffins from being totally dense, and used plain old grocery store sharp cheddar cheese. I don't need to tell you that an artisanal cheddar would elevate them, or that many other hard cheeses (pecorino perhaps, or manchego) would be great too. Dried herbs or some pepper would be a welcome addition. I used skim milk because it's what I keep on hand-I'm sure whole would be great. If you plan to consume these right away, try half a stick (1/4 cup) of melted butter in place of the vegetable oil (using oil generally helps keep muffins moister longer). I plan to take these as a snack for work, but consider them as an excellent bread to serve with breakfast or dinner.
i wish i had a fridge muffins
1-3/4 cups whole wheat flour
3/4 cup ap flour
1 tablespoon baking powder
1 tablespoon sugar
1 teaspoon salt
1 cup (grated) sharp cheddar
1 egg
1 1/4 cups skim milk
1/4 cup canola oil
Preheat the oven to 350. Line a twelve cup muffin tin with paper liners (or, nut and party cups). Whisk flours, baking powder, sugar and salt and a medium-sized bowl. Add grated cheese and mix until the pieces of cheese are mostly separated (this prevents huge clumps of cheese from forming in the muffins). In a smaller bowl (I did this in my four cup measuring cup), beat the milk, oil and egg until thoroughly combined. Pour this mixture into the dry ingredients and mix together, using as few strokes as possible, until all the dry ingredients are moistened. Divide the batter among the cups (they will be pretty full). Bake for about fifteen minutes or until an inserted toothpick emerges cleanly. Cool in the pan for three minutes and then on a rack before storing.
Yields twelve muffins.
i wish i had a fridge muffins
1-3/4 cups whole wheat flour
3/4 cup ap flour
1 tablespoon baking powder
1 tablespoon sugar
1 teaspoon salt
1 cup (grated) sharp cheddar
1 egg
1 1/4 cups skim milk
1/4 cup canola oil
Preheat the oven to 350. Line a twelve cup muffin tin with paper liners (or, nut and party cups). Whisk flours, baking powder, sugar and salt and a medium-sized bowl. Add grated cheese and mix until the pieces of cheese are mostly separated (this prevents huge clumps of cheese from forming in the muffins). In a smaller bowl (I did this in my four cup measuring cup), beat the milk, oil and egg until thoroughly combined. Pour this mixture into the dry ingredients and mix together, using as few strokes as possible, until all the dry ingredients are moistened. Divide the batter among the cups (they will be pretty full). Bake for about fifteen minutes or until an inserted toothpick emerges cleanly. Cool in the pan for three minutes and then on a rack before storing.
Yields twelve muffins.
Wednesday, February 27, 2008
100% whole wheat bread
The addition of vital wheat gluten was excellent. Seriously, I now regret every other time I have made whole wheat bread without it, because the texture is that much better. As I sat in the dining room reading about Animal Behavior, I couldn't stop lightly squeezing the cooling loaves because they were almost pillowy. I've frozen the bread already (made three loaves, heading into that "hibernation" period of the semester where I act like a chicken with no head), but even the toast yesterday was a bit chewier and lighter than my past loaves have been. This is a super simple bread that wasn't too demanding to make. I usually like to fuss with different flours and grains and so on but since this was an experimental loaf (or three) I went with basic. If you decide to try it, pump up the amount of sugar by a little bit if you use regular or brown sugar, or try agave sweetener if you're in on that trend.
whole wheat bread
1/4 cup warm water (warmer than your body!)
1 packet active dry yeast
1 egg, beaten
1/2 stick unsalted butter, melted
2 1/2 cups lukewarm water (a little cooler than your body!)
2-2 1/2 teaspoons salt (use a little more if you don't plan on buttering your bread/using spreads)
1/4 cup honey
5 1/2-8 cups whole wheat flour
12 tablespoons vital wheat gluten (or so)
Put the warm water and yeast in a pretty large bowl, mix up a bit and let sit for five minutes or so until the yeast granules are nice and dissolved. This is a good time to beat up the egg and melt the butter if you haven't done so already. Add the egg, melted butter (I let it cool a bit first), lukewarm water, salt and honey to the yeast mixture and stir until well combined. Now, start adding the flour and vital wheat gluten a bit at a time, it'll be easier if you mix in a cup or two and then add more, rather than pouring it all in at once. Also, since the weather, the price of tea in china, and how exhausted you are might affect how much flour the bread needs on any given day (hence the wide measures), you'll have to pay careful attention to how the dough is looking. I used about 6 cups of flour and 2 tablespoons of gluten per cup, arriving at about 12 tablespoons vital wheat gluten. That'll change depending on how much flour you end up needing. Once the dough is neither dry nor sticky, knead for ten minutes or so (I usually spend about 7 minutes kneading and 3 minutes complaining about how kneading is such an arm workout) and when the dough is nice and satiny, make sure it's a ball and set it to rise in an oiled bowl for an hour, or until doubled. Make sure you oil the surface so it doesn't dry out (I usually cheat and spritz on some Pam Canola) and cover the bowl. I favor a clean, dry kitchen towel but plastic wrap does the job. When the dough has doubled, punch it down firmly but not violently, and cut it into three pieces. Roll the pieces into logs, tuck the ends under, and set them in greased/Pam-d loaf pans to double again, covered. While the logs of dough don't need to touch the sides of the loaf pans, you'll want to make sure the dough is touching both short ends of each pan, which helps it rise. This is especially hard with silicone loaf pans, which is one of the myriad reasons I hate silicone loaf pans. You might want to get the oven going at 400 degrees now, so it's nice and toasty when the bread has risen. The loaves should take about 45 minutes to double (but again, that depends on the temperature, the price of tea, and so on) so use your eyes. Now pop them in the oven for ten minutes, then drop the temperature down to 350 degrees to finish baking. I'm going to say that the bread is done when it sounds hollow on the bottom, but if that isn't clear enough for you, Nicole over at Baking Bites has superb advice.
Yields three yummy loaves.
whole wheat bread
1/4 cup warm water (warmer than your body!)
1 packet active dry yeast
1 egg, beaten
1/2 stick unsalted butter, melted
2 1/2 cups lukewarm water (a little cooler than your body!)
2-2 1/2 teaspoons salt (use a little more if you don't plan on buttering your bread/using spreads)
1/4 cup honey
5 1/2-8 cups whole wheat flour
12 tablespoons vital wheat gluten (or so)
Put the warm water and yeast in a pretty large bowl, mix up a bit and let sit for five minutes or so until the yeast granules are nice and dissolved. This is a good time to beat up the egg and melt the butter if you haven't done so already. Add the egg, melted butter (I let it cool a bit first), lukewarm water, salt and honey to the yeast mixture and stir until well combined. Now, start adding the flour and vital wheat gluten a bit at a time, it'll be easier if you mix in a cup or two and then add more, rather than pouring it all in at once. Also, since the weather, the price of tea in china, and how exhausted you are might affect how much flour the bread needs on any given day (hence the wide measures), you'll have to pay careful attention to how the dough is looking. I used about 6 cups of flour and 2 tablespoons of gluten per cup, arriving at about 12 tablespoons vital wheat gluten. That'll change depending on how much flour you end up needing. Once the dough is neither dry nor sticky, knead for ten minutes or so (I usually spend about 7 minutes kneading and 3 minutes complaining about how kneading is such an arm workout) and when the dough is nice and satiny, make sure it's a ball and set it to rise in an oiled bowl for an hour, or until doubled. Make sure you oil the surface so it doesn't dry out (I usually cheat and spritz on some Pam Canola) and cover the bowl. I favor a clean, dry kitchen towel but plastic wrap does the job. When the dough has doubled, punch it down firmly but not violently, and cut it into three pieces. Roll the pieces into logs, tuck the ends under, and set them in greased/Pam-d loaf pans to double again, covered. While the logs of dough don't need to touch the sides of the loaf pans, you'll want to make sure the dough is touching both short ends of each pan, which helps it rise. This is especially hard with silicone loaf pans, which is one of the myriad reasons I hate silicone loaf pans. You might want to get the oven going at 400 degrees now, so it's nice and toasty when the bread has risen. The loaves should take about 45 minutes to double (but again, that depends on the temperature, the price of tea, and so on) so use your eyes. Now pop them in the oven for ten minutes, then drop the temperature down to 350 degrees to finish baking. I'm going to say that the bread is done when it sounds hollow on the bottom, but if that isn't clear enough for you, Nicole over at Baking Bites has superb advice.
Yields three yummy loaves.
Monday, February 25, 2008
bread
Tonight I experimented with adding vital wheat gluten to my 100% whole wheat bread. It's rising now. Report to come tomorrow in the AM.
I am VERY excited about this because I have been using about 1/3 white flour in my whole wheat bread to improve the texture. 100% whole wheat is a little healthier, right?
I love fiddling with recipes.
I am VERY excited about this because I have been using about 1/3 white flour in my whole wheat bread to improve the texture. 100% whole wheat is a little healthier, right?
I love fiddling with recipes.
Tuesday, February 12, 2008
love for breakfast
NH spent most of the weekend here with me. On Saturday, while trying to decide what to have for breakfast NH suggested we scramble some eggs and purchase some instant biscuits from the store, which I immediately took as a challenge. I make biscuits from scratch all the time, but usually not in the morning, and since once you've had delicious homemade biscuits canned biscuits are far from ideal, I don't have biscuits in the AM too much. But since it was Saturday, I decided it was time to try out some morning baking. NH made the few blocks trek down to the further away, but far better, grocery store to pick up some last minute supplies (like eggs), and I got these started. I went with drop biscuits (faster, more tender) but you could cut down the liquid (by about a quarter) and roll these instead, if you prefer more uniform biscuits, which might be better for spreading with preserves. Cheese and/or herbs would be a nice addition, especially if you wanted to serve these with dinner. You could also change the liquids if you'd prefer a less rich biscuit.
dropped biscuits
roughly adapted from Joy of Cooking
about 1 3/4 cups all purpose flour
1 tablespoon baking powder
about 1/2 teaspoon salt
5 tablespoons very very cold butter (I just took the chill off of some frozen butter), cut into small cubes
1/2 cup whole milk
1/2 cup cream (light, heavy or whipping will do)
Preheat the oven to 450. Combine flour, baking powder and salt in a large bowl. Cut in the butter. Many people do this with knives or that funny looking pastry blending tool, but I prefer to do it with my hands, which is why I used extra cold butter, which can withstand the heat of my hands a bit longer than merely cold butter. Put the cubes in flour, mix it up, and use the tips of your fingers to break the cubes into smaller and smaller pieces, constantly incorporating the pieces with the dry ingredients. Do not let the butter melt! This will destroy your biscuits' texture. The goal is to incorporate the butter as discrete bits mixed in with the flour. When you're done, the flour/butter mixture should resemble coarse bread crumbs. Make a well in the flour/butter mixture, and pour in the cream and milk. Stir the mixture until just combined. Drop lumps onto an ungreased baking sheet (mine were about a scant 1/4 cup sized, but size is to your taste and intentions), and bake for about fifteen minutes or until a light golden brown. Serve warm. These will keep nicely for the next day, and can be reheated in a 250 oven for a few minutes.
dropped biscuits
roughly adapted from Joy of Cooking
about 1 3/4 cups all purpose flour
1 tablespoon baking powder
about 1/2 teaspoon salt
5 tablespoons very very cold butter (I just took the chill off of some frozen butter), cut into small cubes
1/2 cup whole milk
1/2 cup cream (light, heavy or whipping will do)
Preheat the oven to 450. Combine flour, baking powder and salt in a large bowl. Cut in the butter. Many people do this with knives or that funny looking pastry blending tool, but I prefer to do it with my hands, which is why I used extra cold butter, which can withstand the heat of my hands a bit longer than merely cold butter. Put the cubes in flour, mix it up, and use the tips of your fingers to break the cubes into smaller and smaller pieces, constantly incorporating the pieces with the dry ingredients. Do not let the butter melt! This will destroy your biscuits' texture. The goal is to incorporate the butter as discrete bits mixed in with the flour. When you're done, the flour/butter mixture should resemble coarse bread crumbs. Make a well in the flour/butter mixture, and pour in the cream and milk. Stir the mixture until just combined. Drop lumps onto an ungreased baking sheet (mine were about a scant 1/4 cup sized, but size is to your taste and intentions), and bake for about fifteen minutes or until a light golden brown. Serve warm. These will keep nicely for the next day, and can be reheated in a 250 oven for a few minutes.
Monday, January 28, 2008
perfect for vacuuming + an honest look
 Nothing much to say about these Dolce & Gabbana sandals, except they're fierce. I really hate when Christian on Project Runway says that, but it is absolutely true of these. They're fairly plain until you notice the back. They are the focal point of whatever you wear them with. At Nordstrom.
 Honest Look: Tonight, I tried the recipe for brown rice suggested by Abi of Heat Eat Review, and it worked. I baked a loaf of whole wheat bread (it just came out of the oven) and made enough vegetarian chili to eat it for lunch or dinner everyday this week. Overall, I'm happy. I wish I'd managed to squeeze in the brussels sprouts, but, sadly, no.
At least I picked out some really yummy cherries from the grocery store.
Wednesday, January 23, 2008
freeze your own
What have I been munching for breakfast daily since returning to the university? Eggs, fruit and toast made from homemade bread.
This past summer, slightly daunted at the price of mediocre store-bought multigrain loaves, I decided to try my hand at making my own. I'm not going to be like some people I know and argue that bread making is painless (make enough and your arms will be sore the next day) or mess-free, but I do think it's worth it. I'm a huge proponent of knowing exactly what's in everything you eat. I'm finding more and more supermarket loaves contain artificial sweeteners, like sucralose (Splenda) that I'm trying to cut out of my diet. The loaf my mom prefers smells strangely of maple syrup when toasted. Strangely, because I've gone through the ingredients, and it doesn't contain maple syrup, or any natural sugars for that matter.
Bread making is fun, even if it can be challenging, and since long periods of its prep time involve waiting for it, it's a good activity for any decent multitasker. Sometimes I'll start the dough, bake some cookies, and then return to do the second knead, form the loaves, etc. Sometimes I'll read or run errands or do my homework. I haven't tried the fancy no-knead breads people have raved over for the last year, because I don't keep a dutch oven with me at school and haven't really thought to do it at home. Next time I have the opportunity to try it, I will.
Bread machines bore me. I'm never quite happy with the texture of the resulting loaves.
Many bread recipes produce more than one loaf, but luckily, bread freezes pretty well. The downsides are that when it defrosts, it goes stale a little faster than a fresh loaf. I get around this by making mostly breads that are mean to be toasted. I wait till they cool completely, slice the loaf, then double wrap it in foil and freeze. This means I can take out one slice or five as I need them.
I'm not going to post the recipe for the loaf I'm currently consuming, because in my opinion while it's delicious it's just not perfect yet. I took the whole wheat bread recipe from an old copy of the Joy of Cooking, and tweaked a bit. In the end I used 1/3 white flour, 1/3 whole wheat flour, 1/6 oats, 1/6 flax seeds (half meal, half whole seeds). This yielded two loaves that were chewy and flavorful, with lots of nutty whole-wheatness. The bread is better toasted than plain, but takes butter/jam/cream cheese delightfully. I think maybe doing it with some vital wheat gluten or playing around with the flour ratios will perfect it. If I ever do, I'll post.
This past summer, slightly daunted at the price of mediocre store-bought multigrain loaves, I decided to try my hand at making my own. I'm not going to be like some people I know and argue that bread making is painless (make enough and your arms will be sore the next day) or mess-free, but I do think it's worth it. I'm a huge proponent of knowing exactly what's in everything you eat. I'm finding more and more supermarket loaves contain artificial sweeteners, like sucralose (Splenda) that I'm trying to cut out of my diet. The loaf my mom prefers smells strangely of maple syrup when toasted. Strangely, because I've gone through the ingredients, and it doesn't contain maple syrup, or any natural sugars for that matter.
Bread making is fun, even if it can be challenging, and since long periods of its prep time involve waiting for it, it's a good activity for any decent multitasker. Sometimes I'll start the dough, bake some cookies, and then return to do the second knead, form the loaves, etc. Sometimes I'll read or run errands or do my homework. I haven't tried the fancy no-knead breads people have raved over for the last year, because I don't keep a dutch oven with me at school and haven't really thought to do it at home. Next time I have the opportunity to try it, I will.
Bread machines bore me. I'm never quite happy with the texture of the resulting loaves.
Many bread recipes produce more than one loaf, but luckily, bread freezes pretty well. The downsides are that when it defrosts, it goes stale a little faster than a fresh loaf. I get around this by making mostly breads that are mean to be toasted. I wait till they cool completely, slice the loaf, then double wrap it in foil and freeze. This means I can take out one slice or five as I need them.
I'm not going to post the recipe for the loaf I'm currently consuming, because in my opinion while it's delicious it's just not perfect yet. I took the whole wheat bread recipe from an old copy of the Joy of Cooking, and tweaked a bit. In the end I used 1/3 white flour, 1/3 whole wheat flour, 1/6 oats, 1/6 flax seeds (half meal, half whole seeds). This yielded two loaves that were chewy and flavorful, with lots of nutty whole-wheatness. The bread is better toasted than plain, but takes butter/jam/cream cheese delightfully. I think maybe doing it with some vital wheat gluten or playing around with the flour ratios will perfect it. If I ever do, I'll post.
Subscribe to:
Posts (Atom)